Posts Tagged ‘art’

Fix ‘blank’ photo prints problem in GIMP

Many users were surprised to find out that, after upgrading to Maverick, GIMP no longer prints out photographs, but instead prints out blank pages. Fortunately, OMG! Ubuntu has found the fix to this, which should land in Maverick through the update-manager in a few weeks.


Instructions to get the fix (for the impatient)

Since ‘waiting for a few weeks for an annoying bug to be fixed’ is difficult for you and me, OMG! Ubuntu has created a PPA and uploaded the fixed version of GIMP to the PPA.

To install the fixed version of gimp, run the following commands in a terminal one after the other:

sudo add-apt-repository ppa:bilalakhtar/gimp

sudo apt-get update

sudo apt-get dist-upgrade

The PPA contains only the ‘gimp’ package, and it has been tested well, hence there are no chances of ‘horrible things happening’.


Thanks to OMG! Ubuntu

How To | Customize Your Docky

I’ve made it known in the past that I’m a Docky user. I love my Docky, and everything about it. Here are some ways that Docky users can customize their settings to spice things up a bit. Thank you to OMG! Ubuntu for making me aware of these tips.

1. Blur the dock background

  1. Open up Compiz-Config-Settings-Manager from the System > Preferences menu
  2. Enable ‘Blur’ by checking the box next to the icon
  3. Now click on the blur icon to enter the blur config area
  4. Here you want to add Docky to the list of ‘Alpha blur windows’. Use either the ‘grab’ method (by clicking the green cross) or by manually adding ‘class=Docky’ to the entry field.

File:Docky.png

2. Add more themes

Download one of the themes below, click the Anchor icon followed by the ‘Install theme’ button and locate the .tar file. The new themes will be available for use.

3. Change the urgent color glow

The color of the alert ‘glow’ used to notify you that a dock item wants your attention is also configurable. To change it:

  1. Press Alt + F2
  2. Type “gconf-editor” (without the quotes)
  3. Navigate to: apps > docky-2 > Docky > DockController
  4. Experiment with finding a color that suits you by changing the UrgentHue value to a number between -180 to 180. The default is 150.

4. Launch any application using the Anchor icon

You can set the Docky Anchor icon to launch any application you like. Here’s how: –

  1. Press ALT + F2 together
  2. Type “gconf-editor” (without the quotes)
  3. Navigate to: apps > docky-2 > Docky > Items > DockyItem
  4. Enter a command in the DockyItemCommand field to launch a specific application/action.

For example to launch the Gnome Control Centre when clicking on the Anchor enter:

gnomecontrolcenter”

5. Learn how to make themes

You know you want to…I know I want to! There can never be too many themes for Docky. To learn how to make a theme visit wiki.go-docky.com/index.php?title=Theme_Specification. When you have a completed theme, add them to gnome-look.org. 🙂

Finally…

If by the end of all that you’re not ready to end your Docky High…you can download this cool Docky inspired wallpaper made by ~ebupof.

docky_1280_4

For more Docky tips, information and answers to common questions you can head over to the Docky Wiki: wiki.go-docky.com

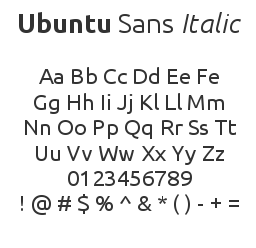
Ubuntu Font Now Available

Personally, I love them. I think that they are really nice. What do you think?

Go to https://launchpad.net/~ubuntu-typeface-interest and click “Join this team” (you’ll of course need a Launchpad account). You should receive an email when you have been accepted to this team. When this happens, do not install the deb! Add the PPA so you can stay up to date with the latest versions of the font!

Important: only join this group if you are willing to provide genuine feedback! Also, most people will be accepted into this group. If you have just created a Launchpad account and/or have 0 karma however, it might take a while until you’re accepted.

Upon being accepted, go to https://launchpad.net/~ubuntu-font-beta-testing for the instructions. Read them carefully, then go to the PPA and read the instructions again. Don’t just add the PPA – > you’ll have to manually add the private PPA to your sources.list! Also, don’t manually download the Ubuntu font .deb files as you won’t get any updates!

Note: clicking the last link in the post without having gained access (by joining the Kubuntu users team or some other team which has access to the font), you’ll get a “page not found” error.

Thanks goes to Webupd8 for these instructions.

GIMP

During my time in the Windows operating system, there were many times in which I needed an art program to do one of many different things. One of the biggest things that I do is create Power Point presentations at work. In these presentations I use a lot of visual examples of what I’m trying to tell my audience (You would be surprised how many people don’t read the words of an instruction manual and instead just follow the pictures).

Back then I was trying to use Windows Paint. If you don’t remember Windows Paint, It was that little program that could barely handle the simple task of Cropping a photo. Needless to say, it was not worth using any longer. Then I made the switch to Ubuntu and discovered GIMP.

Here’s a little description of the program shown on GIMP’s website…

GIMP is an acronym for GNU Image Manipulation Program. It is a freely distributed program for such tasks as photo retouching, image composition and image authoring.

It has many capabilities. It can be used as a simple paint program, an expert quality photo retouching program, an online batch processing system, a mass production image renderer, an image format converter, etc.

GIMP is expandable and extensible. It is designed to be augmented with plug-ins and extensions to do just about anything. The advanced scripting interface allows everything from the simplest task to the most complex image manipulation procedures to be easily scripted.

I have to say, GIMP is quite the amazing program. It has saved me so much time, but more importantly headache, when I create my instruction manuals. But other than that, GIMP has allowed me the ability to touch up pictures so that they look flawless, I’ve also used it to create favicons for websites.

The only thing about the programs that really bothered me was that I was not able to use it while I was at work using Windows XP. I was still stuck making everything on my personal computer at home or using RealVNC to access my computer at home and then email the finished product back to my work station. This is when I discovered something wonderful…..

GIMP is written and developed under X11 on UNIX platforms. But basically the same code also runs on MS Windows and Mac OS X.

That’s right folks. GIMP is not only available for Linux, but also for Mac OS X and Windows. My life has become so much better/easier after discovering GIMP. Give it a shot….trust me.

GIMP

Please note that this is NOT me creating this video. Created by GIMP Know How.