Archive for the ‘How To’ Category

Create a Background Slideshow [CreBS]

If you’re anything like me, you’ve been looking for a nice and easy way to create your own Slideshow Wallpaper. I still don’t quite understand why this feature would have been added to Ubuntu without a simple tool that can be used to create one yourself, whatever. When this was first released, I thought to myself, “I’m sure the Ubuntu devs will release a program to create these things in the next version of Ubuntu”…I was wrong.

Yes I know that I can break down the XML file and create my own Slideshow, but that can get to be quite tedious, especially it you have more than five wallpapers in the show. Well, after some time, and even forgetting about the idea of creating one by myself, I stumbled upon an app that can achieve exactly what I’ve been looking for.

Introducing CreBS! Also known as “Create a Background Slideshow.”

CreBS will allow you to add as many wallpapers/pictures as you like, adjust the delay between changes and the length of transition. It’s a great app. But lets get down to the part you really wanna see, how to download/install the app and then how to use the thing.

Here are the three commands needed to download/install:

sudo add-apt-repository ppa:crebs/ppa
sudo apt-get update
sudo apt-get install crebs

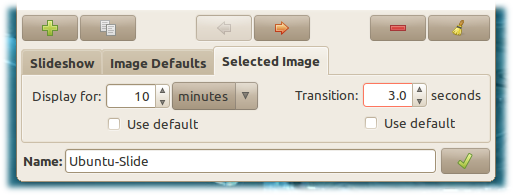
Step 1: Now that you have the app installed, it’s time to get started. Once you have the app open, click on the “plus” icon to select the pictures you would like to use for your slideshow.


Step 2: Choose the “Display for” and “Transition” times. You can use the defaults or you can select your own times.


Step 3: Click the check mark to save and set the wallpaper.


Now you can enjoy your new Wallpaper Slideshow…excuse me…Background Slideshow. šŸ™‚ By the way, you may or may not have noticed that my screenshots have what looks like different backgrounds in them, that’s because I typed up this post and took theĀ  screenshots while my wallpaper was changing. šŸ™‚

Intelligent Plymouth Boot Splash

This is an idea straight out of those futuristic 80’s movies! However, it works and it’s not done on a Commodore 64. With this neat little customization, your splash screen will be happy to greet you any time you want to use your computer. Created by OMG!Ubuntu reader Shnatsel and assured to do nothing to hurt your computers, it’s ready to go! šŸ˜€

ā€œIt also should be safe to install and use ā€“ it wonā€™t break anything, the worst thing it can do is fall back to text mode (but the system will still boot to GUI).ā€

First thing to be aware of us is if Plymouth looks like a mess to you now it will continue to look a mess with this; youā€™ll need to fix that.

sudo add-apt-repository ppa:shnatsel/plymouth

sudo apt-get update && sudo apt-get install plymouth-theme-smooth-greeting

To uninstall run:

sudo apt-get remove plymouth-theme-smooth-greeting

loader02 

How To | Gnome Panel As A “Wingpanel”

Liking that new fangled Wingpanel we’re all hearing about? Want one of your own? Turn your Gnome Panel in to one!

The trick is to get a floating Gnome panel (the rest is pretty much obvious). Read on!

Step 1. Remove all the panel applets that you don’t want to use – like the menu.

Step 2. Right click the panel, select “Propreties” and on the “General” tab, uncheck the expand option and enable autohide. Now simply drag the panel to the right side of the screen.

Step 3. Now let’s simulate a “floating effect” for the Gnome panel (that means the panel will always be visible but it covers the applications as opposed to when the panel is always visible – when the windows cannot go underneath the panel):

Press ALT + F2 and enter “gconf-editor”, navigate to apps > panel > toplevels and click “panel_0” or “panel_1” (it depends on the panel you want to apply this for). Then, modify the “hide_delay” key value to “2147483647” which is the maximum supported value. This is the panel hide delay which is now set to “2147483647” so the panel will take around 600 hours to hide (so it’s not really going to hide), thus becoming a “floating panel”.

Tip thanks to Justin | via Justin Stories.

How To | Boost Flash Performance

Want better flash performance in Ubuntu? OMG! Ubuntu reader Eduardo got in touch to share a nifty hack to get just that.

How? Iā€™ll let Adobeā€™s Mike Melanson explain:

“ā€¦there is [an] option in mms.cfg that will be of use to Linux users: ā€œOverrideGPUValidationā€. Pursuant to the need to have such stringent rules for validating whether the Linux Flash Player can use the GPU. If you wish to force the Flash Player to bypass its GPU validity checks, add ā€œOverrideGPUValidation=trueā€ (without the quotes) to your mms.cfg.”

This allows you to boost Flash by bypassing GPU validation. Eduardo tested it and said ā€˜the difference is noticeable.ā€™

Eduardo provides two ways to enable it:

Using the terminal enter:

sudo mkdir /etc/adobe && echo “OverrideGPUValidation=true”|sudo tee /etc/adobe/mms.cfg

He also notes that it may be possible to enable it via the hidden adobe folder inside the home folder, in which case use:

echo OverrideGPUValidation=true >> ~/.adobe/mms.cfg

How To | Change Your MeMenu Name

Itā€™s a known and reportedĀ bug and while an easy front-end setting to choose the display name is still lacking, this can still be changed.

Responding to the bug report with a fix was a user called Ar. You can use either the Terminal to get the changes (easiest) or manually via the Gconf-Editor (ALT+F2 > gconf-editor)

To remove the name from the MeMenu altogether:

gconftool -s /system/indicator/me/display --type int 0

To show your real name/ā€™about meā€™ name:

gconftool -s /system/indicator/me/display --type int 2

To display the default account username:

gconftool -s /system/indicator/me/display --type int 1

Note: The gconf-editor option will not be available until you attempt to change this option using the terminal first.

How To | Use Docky Anchor to Change Docky Icons

In the past I talked about how a Docky user can change their Docky icons by navigating to the appropriate folder in Nautilus. Well, now I can take that one step further.

I’m going to show you how to use your Docky Anchor icon to navigate directly to that lovely Nautilus folder all with one click. For those of you that are worried that doing this might not allow you to open your Docky Settings, don;t worry. You will still be able to right-click on the Anchor and click Settings.

Step 1: GConf-Editor

  • Open your gconf-editor by navigating to Applications > System Tools > Configuration Editor (or gconf-editor in your terminal)
  • Navigate to /apps/docky-2/Docky/Items/DockyItem/
  • Change DockyItemCommand to gksu nautilus /usr/share/applications
  • Close GConf-Editor

Step 2: Change your Icons

  • Click on your Docky Anchor
  • Type in your password
  • Navigate to the program icon you would like to change

How To | Droid VNC Server

If you’re anything me, you’ve Rooted your Android phone and you’re looking for all of the coolest apps available to you. For a long time I’ve been looking for a great app that would allow me to remotely access my HTC DROID Incredible using VNC. Why would I want to remotely access my phone you ask? I’m lazy. No, just kidding. šŸ˜‰

Benefits of remote access:

  • Access to your phone if it’s not immediately with you.
  • Ability to create a screencast.
  • Faster screen shots.
  • Ability to help & support other Android users.
  • Access your phone if you’re at work or school and don’t want to look like you’re on your phone. šŸ˜‰
  • etc…

Well, now I have discovered Droid VNC Server. Created by onaips at the XDA forums.

Droid VNC Server is a great little app. It’s not without it’s bugs, but the bugs that I have do not even come close to outweighing it’s positives. While I have not officially seen any confirmations of Droid VNC Server working on the Incredible, it does work quite nicely for me. In regards to other Android phones, your mileage may vary, but you can check out onaips blog to see a small listing of confirmed functional devices.

Ok, enough talking. How do I use this thing?

Step 1: Preparing your computer

You will have to be sure that you have a VNC Viewer installed on your computer first. Here’s a quick list of programs that can be used:

  • Linux – Remote Desktop Viewer (However, I use the command line). Remote Desktop Viewer is pre-installed in Ubuntu.
  • Mac – Chicken of the VNC.
  • Windows – RealVNC.

Step 2: Preparing your Android device

  • Scan the QR Code at the top of the page to be directed to the Droid VNC Server page in the Android Market.
  • Open Droid VNC Server and tap Start Server.
  • Suggestion – Connect to a wireless signal that your computer is also using or use USB. (I have not yet tested USB & Verizon does not support VNC through 3G)
  • Feel free to modify any of the options in Menu > Settings. (I’d recommend a password)

Step 3: Connect to your Device

  • Open your VNC Viewer of choice and type in the IP:Port that you see listed on the Droid VNC Server home screen.
  • Type in your password if needed.
  • You should now see your Android Device!

Some helpful things to know:

Some possible incorrect keybindings: (I have a feeling this is an Android thing…)

  • = sends +
  • ! sends ~
  • ~ sends 0
  • < sends *
  • > sends #
  • / sends :

These are important to know: šŸ˜‰

  • home = home
  • right-click = home, also
  • pg up = menu
  • pg down = call
  • pg down long press = redial most recent
  • esc = back
  • del = back, also
  • end = phone sleep
  • type = from the home screen random typing will initiate google search

Here are some instructions for using VNC through USB:

I have heard that USB will provide a faster VNC connection. With adb installed and the device plugged in via USB:
adb forward tcp:5901 tcp:5901
adb forward tcp:5801 tcp:5801

Using your preferred VNC Viewer, connect to:

localhost:5901

YouTube How To (Not created by me)


How To | Install Docky Stacks

Install Stacks in Docky with one command

The script automatically fetches and installs the files needed to both install and successfully run Docky with Stacks.

Open a terminal and enter the following line carefully:

wget href="http://www.panticz.de/sites/default/files/Docky/compile.docky.stacks.sh.txt -O - | bash -


Click here to see the original article and the source code of the bash script.

How To | Root HTC DROID Incredible Using Ubuntu

Superuser Access

UPDATE: If you have installed the newest OTA update (Nov. 2010) this tutorial will no longer work. It seems that the latest OTA update included a patch that closed the hole used for rooting the Incredible. Read more here.


UPDATE: This just in from the unrEVOked twitter account.

unrevoked unrevoked dev team
Incredible people stuck w/ new OTA: we have a fix in the pipe for you; expect a release in a day or two. EVO folks: temporary fix on XDA.


I searched on many different websites that teach people how to Root their Incredible, but I was never able to really locate a tutorial that focused solely on Rooting in an Ubuntu (or Linux at all) environment. Many of them would mention Linux, but would be very general. I would see statements like: “The steps will work relatively the same in Linux.” Well, that was not good enough for me and with any luck this tutorial will come in handy for all of you Ubuntu/Incredible users. šŸ™‚

This guide is an adaptation of Bob Denny’s tutorial that can be found here. For this tutorial, I will be using unrEVOked3 since it’s easily the most simple Rooting process.

Step 1: Preparation – Ubuntu

Before you will be able to do anything, you will need to ensure that you have the Android SDK installed on your system. If you have already done thins, skip to Step 2: Preparing The Phone.

  • Android SDK | Android Developers
  • Extract tar.gz file; you can rename extracted folder to whatever you like (e.g., “android”)
  • Move “android” folder to the root of your drive using this command in your terminal:

sudo mv /path/to/android /

  • Run “Android SDK and AVD Manager” using this command: (I added mine to the Applications menu for simplicity)

/android/tools/android update sdk

  • Now ensure that the ADB Server is running as root:

sudo ./adb start-server

  • Ensure that your Incredible is recognized by ADB

adb devices

Note: that you do not need to download any drivers for Linux. The phone is already supported.

Step 2: Preparing The Phone

  • Verify that you have an SD Card installed with at least 2Gb free space. If the SD is smaller than 4Gb, make sure it is FAT32 formatted. Look at it on gParted to be sure.
  • Boot the phone normally.
  • Enable USB Debugging (Settings > Applications > Development).
  • Enable Unknown Sources (Settings > Applications at the top).
  • Enable USB “Ask Me” mode (Settings > Connect to PC).
  • Plug in the USB cable and choose Charge Only on the phone.

Step 3: Rooting The Phone

sudo ~/Desktop/reflash

(if this does not work and unrEVOked sits there not doing anything, open Nautilus with root and double-click the file)

If you did everything right, and if your phone is a stock 2.2 Incredible, Reflash will come up and start the rooting process.

Be patient! The process involves several (4) reboots and some long periods of apparent inactivity. Let it go. Wait for at least 5 minutes before deciding it has become stuck.

How to know it worked:
Once the Reflash process completes (5 or so minutes), unplug the USB and reboot the phone. It will look normal. Open the App tray and look for the Superuser app. If you open Superuser it will be blank, that’s normal. For final confirmation, reboot the phone into HBOOT (volume down + power) and see if it says S-OFF at the top. If so, you’re rooted!

Step 4: Backing up the phone
Now that you’re rooted and in HBOOT, it’s time to do a complete backup of the phone (a.k.a. Nandroid backup). DO THIS NOW!

  • In HBOOT, using the volume buttons move to RECOVERY and press the Power button. The phone will appear to reboot but it will end up in the ClockWorkMod recovery screen. From now on use the trackball on the Incredible (click to select).
  • Move to Backup and Recovery, then select. This will show the Backup and Recovery menu.
  • Move to Backup
  • Select to start the backup.
  • When the backup completes (several minutes), press the power button to return to the main ClockWorkMod menu
    Select Reboot System, go.

When the phone boots to its normal mode, you’re done! Now you can enjoy the benefits of root. šŸ™‚

How To | New fix for Ubuntu Plymouth

Plymouth Ubuntu

I’ve talked about this in the past, but with this release of Ubuntu 10.10 I thought it would be a good idea to bring this up again. Thanks to Webupd8 for putting together a post for an even simpler fix for this.

Fix The Ubuntu Plymouth with proprietary Nvidia or ATI graphics drivers

Warning: use it at your own risk! Only use this script if you know your way on the command line and can revert everything manually in case something goes wrong. I’ve used it to fix the Plymouth on Ubuntu 10.10 Maverick Meerkat (with proprietary Nvidia graphics drivers) but I cannot guarantee it will also work for you (and that it won’t break stuff). The script should work with both Ubuntu 10.04 Lucid Lynx and Ubuntu 10.10 Maverick Meerkat.

To fix Plymouth, run the following commands (will download and run the script):
cd
wget http://launchpadlibrarian.net/57638460/fixplymouth
chmod +x fixplymouth
./fixplymouth

Or you can manually download the script from HERE.

Warning: only run the script once!

Fix plymouth script

After running it, the script will display a list of screen resolutions supported by Plymouth (specific for your computer). Enter the best resolution from the list displayed by the script under the following format: 1024×768-24 (this is just an example)! This is the only difference between this script and Kyleabaker’s script (in which you had edit the script with your Plymouth screen resolution and most people never knew what’s the maximum resolution supported by Plymouth for their computers).

If hwinfo (which is automatically ran by the script) doesn’t display the supported resolutions for your monitor, see the second solution from HERE.

Revert the changes made by this script

All the changes made by this script can be reverted using kyleabaker’s revert script. There is a download link at the end of THIS post.
Credits for the script in this post: d0rkye and kyleabaker.