LibreOffice 3.3 Official Release

The day has come. LibreOffice 3.3 has finally hit its official release. And unlike RC3, this version is also available to 10.04 users. The latest version brings some pretty nice enhancements:

  • Import and work with SVG files
  • Easy way to format title pages and their numbering in Writer
  • Improved Navigator Tool for Writer
  • Improved ergonomics in Calc for sheet and cell management
  • Microsoft Works and Lotus Word Pro document import filters.

Click here for a full list of what makes LibreOffice 3.3 great: http://www.libreoffice.org/download/new-features-and-fixes/

Here’s how to Install:

sudo add-apt-repository ppa:libreoffice/ppa

sudo apt-get update && sudo apt-get install libreoffice

If you like, you can also download the .DEB package from here:

http://www.libreoffice.org/download/

Create a Background Slideshow [CreBS]

If you’re anything like me, you’ve been looking for a nice and easy way to create your own Slideshow Wallpaper. I still don’t quite understand why this feature would have been added to Ubuntu without a simple tool that can be used to create one yourself, whatever. When this was first released, I thought to myself, “I’m sure the Ubuntu devs will release a program to create these things in the next version of Ubuntu”…I was wrong.

Yes I know that I can break down the XML file and create my own Slideshow, but that can get to be quite tedious, especially it you have more than five wallpapers in the show. Well, after some time, and even forgetting about the idea of creating one by myself, I stumbled upon an app that can achieve exactly what I’ve been looking for.

Introducing CreBS! Also known as “Create a Background Slideshow.”

CreBS will allow you to add as many wallpapers/pictures as you like, adjust the delay between changes and the length of transition. It’s a great app. But lets get down to the part you really wanna see, how to download/install the app and then how to use the thing.

Here are the three commands needed to download/install:

sudo add-apt-repository ppa:crebs/ppa
sudo apt-get update
sudo apt-get install crebs

Step 1: Now that you have the app installed, it’s time to get started. Once you have the app open, click on the “plus” icon to select the pictures you would like to use for your slideshow.


Step 2: Choose the “Display for” and “Transition” times. You can use the defaults or you can select your own times.
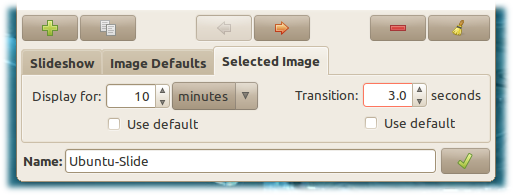
 

Step 3: Click the check mark to save and set the wallpaper.


Now you can enjoy your new Wallpaper Slideshow…excuse me…Background Slideshow. šŸ™‚ By the way, you may or may not have noticed that my screenshots have what looks like different backgrounds in them, that’s because I typed up this post and took theĀ  screenshots while my wallpaper was changing. šŸ™‚

Install Wingpanel From PPA

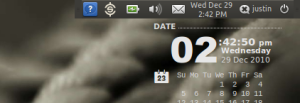
Wingpanel
For those who don’t know, Wingpanel is a “super sexy space-saving top panel” created by the Elementary team that displays the Ubuntu indicators. Because it doesn’t take the whole width of the screen and maximized windows go below it, it can save a lot of vertical screen space.

To install Wingpanel in Ubuntu 10.10 Maverick Meerkat from the Ripps Misc. PPA, use the following commands:

sudo add-apt-repository ppa:ripps818/ppa && sudo apt-get update
sudo apt-get install wingpanel && wingpanel
Note: you may want to either move or completely delete the top panel if you decide to use Wingpanel.
You can achieve the same thing by using a Gnome panel or even AWN as a wingpanel.

LibreOffice Ubuntu PPA

The PPA provides packages for Ubuntu 10.04, 10.10 and 11.04 users. While LibreOffice has yet to make a stable release it is currently at release candidate stage.

To add the PPA and install LibreOffice RC2 run the command below in a new Terminal session:

sudo add-apt-repository ppa:libreoffice/ppa
sudo apt-get update && sudo apt-get install libreoffice

Run this command so that LibreOffice does not look like it’s running in WINE:

sudo apt-get install libreoffice-gnome
________________________________________________________________________

Note: Running These commands WILL remove OpenOffice from your computer.

Intelligent Plymouth Boot Splash

This is an idea straight out of those futuristic 80’s movies! However, it works and it’s not done on a Commodore 64. With this neat little customization, your splash screen will be happy to greet you any time you want to use your computer. Created by OMG!Ubuntu reader Shnatsel and assured to do nothing to hurt your computers, it’s ready to go! šŸ˜€

ā€œIt also should be safe to install and use ā€“ it wonā€™t break anything, the worst thing it can do is fall back to text mode (but the system will still boot to GUI).ā€

First thing to be aware of us is if Plymouth looks like a mess to you now it will continue to look a mess with this; youā€™ll need to fix that.

sudo add-apt-repository ppa:shnatsel/plymouth

sudo apt-get update && sudo apt-get install plymouth-theme-smooth-greeting

To uninstall run:

sudo apt-get remove plymouth-theme-smooth-greeting

loader02 

How To | Gnome Panel As A “Wingpanel”

Liking that new fangled Wingpanel we’re all hearing about? Want one of your own? Turn your Gnome Panel in to one!

The trick is to get a floating Gnome panel (the rest is pretty much obvious). Read on!

Step 1. Remove all the panel applets that you don’t want to use – like the menu.

Step 2. Right click the panel, select “Propreties” and on the “General” tab, uncheck the expand option and enable autohide. Now simply drag the panel to the right side of the screen.

Step 3. Now let’s simulate a “floating effect” for the Gnome panel (that means the panel will always be visible but it covers the applications as opposed to when the panel is always visible – when the windows cannot go underneath the panel):

Press ALT + F2 and enter “gconf-editor”, navigate to apps > panel > toplevels and click “panel_0” or “panel_1” (it depends on the panel you want to apply this for). Then, modify the “hide_delay” key value to “2147483647” which is the maximum supported value. This is the panel hide delay which is now set to “2147483647” so the panel will take around 600 hours to hide (so it’s not really going to hide), thus becoming a “floating panel”.

Tip thanks to Justin | via Justin Stories.

How To | Boost Flash Performance

Want better flash performance in Ubuntu? OMG! Ubuntu reader Eduardo got in touch to share a nifty hack to get just that.

How? Iā€™ll let Adobeā€™s Mike Melanson explain:

“ā€¦there is [an] option in mms.cfg that will be of use to Linux users: ā€œOverrideGPUValidationā€. Pursuant to the need to have such stringent rules for validating whether the Linux Flash Player can use the GPU. If you wish to force the Flash Player to bypass its GPU validity checks, add ā€œOverrideGPUValidation=trueā€ (without the quotes) to your mms.cfg.”

This allows you to boost Flash by bypassing GPU validation. Eduardo tested it and said ā€˜the difference is noticeable.ā€™

Eduardo provides two ways to enable it:

Using the terminal enter:

sudo mkdir /etc/adobe && echo “OverrideGPUValidation=true”|sudo tee /etc/adobe/mms.cfg

He also notes that it may be possible to enable it via the hidden adobe folder inside the home folder, in which case use:

echo OverrideGPUValidation=true >> ~/.adobe/mms.cfg

Plymouth Manager | Change Your Boot Theme

If youā€™re fortunate enough to have a graphics card capable of displaying Plymouth boot splashes then ā€˜Plymouth Managerā€™ may just be of interest.

Features include:

  • Enable/disable Plymouth
  • Set splash resolution
  • Fixing errant errors
  • Choosing/creating new themes

Find most recent download at launchpad.net/plymouth-manager/+download

If you’re up for the task, why not help translate it to yourĀ language? http://plymouthmanager.wordpress.com/about/

Fix ā€˜blankā€™ photo prints problem in GIMP

Many users were surprised to find out that, after upgrading to Maverick, GIMP no longer prints out photographs, but instead prints out blank pages. Fortunately, OMG! Ubuntu has found the fix to this, which should land in Maverick through the update-manager in a few weeks.


Instructions to get the fix (for the impatient)

Since ā€˜waiting for a few weeks for an annoying bug to be fixedā€™ is difficult for you and me, OMG! Ubuntu has created a PPA and uploaded the fixed version of GIMP to the PPA.

To install the fixed version of gimp, run the following commands in a terminal one after the other:

sudo add-apt-repository ppa:bilalakhtar/gimp

sudo apt-get update

sudo apt-get dist-upgrade

The PPA contains only the ā€˜gimpā€™ package, and it has been tested well, hence there are no chances of ā€˜horrible things happeningā€™.


Thanks to OMG! Ubuntu

How To | Change Your MeMenu Name

Itā€™s a known and reportedĀ bug and while an easy front-end setting to choose the display name is still lacking, this can still be changed.

Responding to the bug report with a fix was a user called Ar. You can use either the Terminal to get the changes (easiest) or manually via the Gconf-Editor (ALT+F2 > gconf-editor)

To remove the name from the MeMenu altogether:

gconftool -s /system/indicator/me/display --type int 0

To show your real name/ā€™about meā€™ name:

gconftool -s /system/indicator/me/display --type int 2

To display the default account username:

gconftool -s /system/indicator/me/display --type int 1

Note: The gconf-editor option will not be available until you attempt to change this option using the terminal first.